- June 4, 2020
How to install WordPress: Complete Guide 2021
Reading Time: 10 minutesDo you want to start using WordPress 2021 to create and manage your website? WordPress is the world’s most popular content management system (CMS) and website builder. In this guide, we will show you how to install WordPress on multiple platforms.
Over 30% of the websites currently online have been created using WordPress. This makes WordPress the most used software to build a website. It is easy to set up and very useful to design pages or blogs quickly. There are 2 ways to use WordPress: WordPress.com, which is an expensive and not fully customizable solution; and WordPress.org, also known as self-hosted WordPress. In this guide we will show you how to use the latter.
Most hosting companies offer different options on how to install WordPress 2021 with 1 click. However, the setup process for each hosting panel is different.
How to install WordPress using Softaculous?
Softaculous is an auto installer script used by various web hosting companies. This application lets you install WordPress immediately. That is the reason why many large hosting companies offer Softaculous in their control panels.
Log in to your web hosting control panel and search for Softaculous in the Software section. In some dashboards, you’ll also find a separate Softaculous App Installer section with all apps visible on the dashboard. You can click on the WordPress icon and install it directly from there.

How to install WordPress using Softaculous?
You can choose either way to install it. If you click on the WordPress icon in the Softaculous Application Installer section, it will show you an overview of WordPress. You will also see other tabs like Install, Features, Screenshots, etc. Click on the Install tab to start the installation process.

First, you will have to choose between the protocols Http: // or Http: // www. If you are using SSL and HTTPS, simply choose Https: // or Https: // www from the protocols dropdown menu.
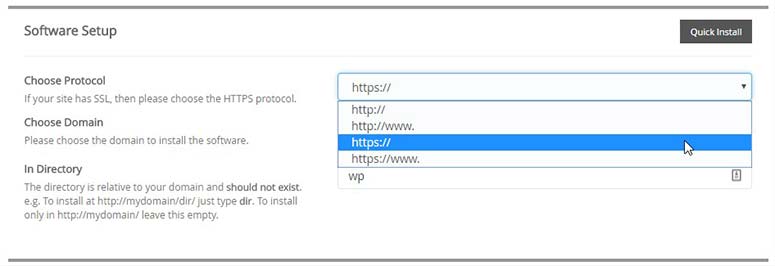
Next, select the domain name where you want to install WordPress. After choosing the domain name, you will need to add a subdirectory (for example: myweb.com/wp) where you want WordPress to be installed. The directory will be created automatically and WordPress will be installed there.
However, if you want to install WordPress in the root directory (for example: mywebsite.com), leave the In Directory field blank. Once you have filled the software setup settings, you will have to fill in Site Settings.

In this section you will have to add the name and description of your site. These details are not permanent and you can easily change them from your WordPress admin panel at any point needed.
After that, you’ll have to provide a username, password, and email address to create credentials for your WordPress admin area. You can use the Softaculous password generator to add a strong password. Remember that the username must not be a word that appears in the dictionary.
There are no specific rules for setting a username or password. However, we recommend that you choose a username and a password that you can easily remember. A strong password will help protect your site from hackers.
The email field is important because every WordPress notification will be sent to the email address you provide there. These notifications include update alerts, password reset, and more.
Once you’ve finished with Site Settings fields, you can select the plugins and theme for your site. These are optional settings and you can also manage them from your WordPress admin panel after installation. Click on the Install button.
After a few minutes, you will see a message about the installation of WordPress. Stay on the installation screen until the progress bar shows 100% to avoid any problems. After a successful installation, you will see your WordPress website URL and your WordPress admin login URL.
How to install WordPress using FTP?
Do you want to install WordPress manually using an FTP client? In this case there are a few more steps to add to the installation process.
Before you start, you will have to download the latest version of WordPress from its official site. Unzip the file and use an FTP client like FileZilla to upload the WordPress files to the root directory. Usually the root directory is called / public_html /.
If you want to install WordPress in a subdirectory (for example: mywebsite.com/wp), you can create a folder within the root directory with the respective name and upload your WordPress files there. In this case, your extension on the FTP client will be / public_html / wp.

How to install WordPress in a subdirectory.
After uploading your WordPress backup, you will have to log in to your web hosting control panel to create a new database. In your cPanel, you should look for the Databases section and click on the MySQL Databases icon.

MySQL databases icon.
Fill in the New Database field with your database’s name. Click on the Create Database button.

Once you have created your database, you will need to enter your MySQL username and password. These credentials will belong to your database and will be used in your WordPress configuration file.
Once you have added the username and password, click the Create a user button.

Creating a user is not enough. You will have to grant access to this new user to connect with your database. Simply add the user to your database with all permissions.
To do this, go to the Add a User to a Database section on the same page. In the User dropdown menu, select the new user you have just created and then select your database from the Database dropdown menu. Click on the Add button.

This will show you the user privileges page. You will have to select all the privileges for this new user to make changes to your database. Once that’s done, head back to the installation process. You will need to navigate back to the WordPress URL to start the installation process. If you’ve uploaded the WordPress files to the main root directory, your domain name will be the WordPress URL (for example: www.mywebsite.com)
First, it will ask you to select a language. After selecting the language, click on the Continue button. Now, the complete WordPress installation process will be in this language. If you did not choose the correct language, you can change it later from the WordPress administration settings.
Next, you will see the welcome message and information about your new WordPress installation. Double check the information, WordPress will need to access the credentials of your database to start correctly.
Click on the Continue button.
Next, you will see a form where you have to fill in your Database name, and your username and password. Click the Submit button.

Once a successful connection to your database is established, you will see a WordPress message. Click the Run install button to continue.
WordPress installer will run in the background creating tables in your database and everything you’ll need for the next steps.
To configure your WordPress, enter the title, username, password and email address of your site .
You may not want search engines to find your website during the development phase. You can hide it by clicking (check box) the search engine visibility option. These settings are easy to change from your WordPress admin account.

Once you click on the Install WordPress button, and the installation is completed, a “Success!” message will display. You’ll also see the login details to access your WordPress admin account.

How to install WordPress in other languages?
This platform is translated into almost every language in the world. Here we will show you how to install WordPress easily in your own language.
To name a few, WordPress includes languages like English, French, Spanish, Chinese, Japanese, Arabic, Korean, German, Hebrew, Hindi, and many others.
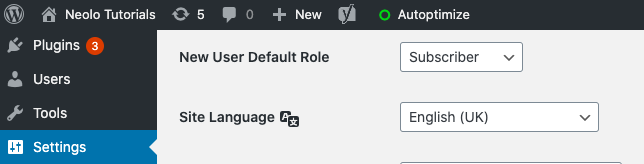
When installing WordPress, it will ask you to select a language and the rest of the installation would then be in the chosen language. However, if you have selected English during the installation process and then want to change the language, simply go to Settings > General in your WordPress dashboard.
What to do after installing WordPress 2021?
After successfully installing WordPress, select your theme and plugins to start your website.
Selecting a WordPress theme
A theme or website template is an overall look of the design and style on your site. You’ll find hundreds of thousands of themes available online and in the WordPress repository. It is very difficult to pick a theme when there are so many options. We recommend that you focus your search on WordPress themes that match your business niche.
Choosing the best WordPress plugins
WordPress is flexible and easy to configure. It allows you to add any features you want on your website using WordPress plugins. Whether you want to add a contact form, optimise your website for search engines, protect your website from hackers or any other functionality on your site, there is a good chance that you will find a plugin for it in the WordPress directory .
In addition to the WordPress repository, you can find premium plugins that are available as third-party tools on the Internet to extend the functionality of your website.
What plugins will you need to install on your WordPress 2021 site?
Here is a list of the plugins you’ll need to add to your website after installation:
• Add contact form: You will need to add a contact form to your WordPress website.
• Add Google Analytics Tracking: Add Google Analytics Tracking to your new WordPress site by installing the MonsterInsights plugin.
• WordPress security: make your website secure by installing some of the best WordPress security plugins.
• Improve WordPress SEO: Optimise your website using the best WordPress SEO plugins.
• WordPress Performance: Speed up your site by installing the best WordPress caching and other performance plugins.
• Avoid spam: install the Akismet plugin on your WordPress blog and stay away from spamming.
• Increasing traffic to your website: Easily increase your website’s traffic and customer base using the best WordPress lead generation plugins.
How to install WordPress on your computer or laptop 2021?
We have learned how to install WordPress on your web server. But what if you need a local development environment where you can create WordPress sites, themes and plugins for clients or personal use? In the next section we will show you how to install WordPress on your Windows PC or laptop.
How to install WordPress on Windows with WAMP?
How to install WordPress with WAMP.
For this subsection, you’ll need a new copy of WordPress and a software known as WAMP. WAMP stands for “Windows, Apache, MySQL, PHP/Perl/Python” and it allows you to create a local server environment to install WordPress.
How to install WAMP
It is simple to install WAMP on your Windows computer. Just double-click the installation package and follow the instructions until you see the Finish option.
Don’t change the default settings, that is, the installation directory, SMTP and email. Also, add a firewall exception for your Apache HTTP server. This will be automatically requested, so don’t worry about it. Once the installation is complete, start WampServer.
You need to make sure their server is up and running before rushing to install WordPress. To do that, look for the WAMP icon on your taskbar. Generally it is a capital “W”.
How do you know if your WampServer is working?
If the icon is red, the server is not running and you will have to restart the server or your PC. If the icon is orange, the MySQL service is offline or starting. Give it a couple of minutes and if the icon doesn’t turn green, restart the server. If the icon is green, it means you are ready to go.
WordPress needs a MySQL database to run. This is where the information about your WordPress installation is stored.
How to create a 2021 database?
It is really easy to create a 2021 database. To do this, follow these steps:
• Click on the WAMP icon and choose phpMyAdmin. This will launch a new tab called phpMyAdmin. Click on the Databases tab.
• In the Create database field, enter a name for the database you want and press the Create button. If successful, close phpMyAdmin and follow the steps to install WordPress.
How to install WordPress 2021?
Now is when it gets interesting. To install WordPress 2021, extract your WordPress ZIP file into c: \ WAMP \ www. Inside c: \ WAMP \ www, you should find a new WordPress folder. Your WordPress platform will be accessible through http: // localhost / wordpress in your browser.
To install WordPress you will have to create a configuration file (wp-config.php) and enter the relevant details. Open http: // localhost / wordpress in your default browser and click the Create a configuration file button. Then click Continue on the next page.
Next, fill in the required details, i.e. database name, username, password, database host and table prefix. Use “root” as your username and leave the password field blank. The database host is localhost by default, don’t change it. Press the Submit button. If you receive the following message, your database connection was successful.
If you receive an error establishing the database connection message, check where it went wrong and make the modifications needed. Press the Run this installation button and enter your site details on the next page. Once you’ve filled in all the information, click the Install WordPress button, and that’s it! You can now log in to your local WordPress installation by navigating to http: // localhost / wordpress / wp-admin.
We hope you found this note helpful and that you learnt about the most popular CMS. If you have not installed WordPress 2021 and created your website, you can do so now.
Have you thought about having your own website?
Updated: 7/1/21.